Navbar

Image Map

Sunday, March 1, 2015

Laura Lately: Golden Week Edition

Hi everybody! February is over but that's not all... It's what I'm calling my Golden Week!

Because for this week, my kiddo and I are 27 weeks and 27 years old, respectively! Yes, today and yesterday I am celebrating turning 27.  (Since there is no February 29th this year, I celebrate my birthday on both February 28th AND March 1st.)

So happy non leap year everybody! And happy non birthday to me!

The Golden Week.  Normally during Laura Lately posts, I post about this last month and what I've been watching/reading/eating/thinking/feeling/looking forward to... but this month I thought I'd catch ya'll up on more pregnancy related happenings. 


Also, in celebration of the golden week, I decided it was high time for a bump picture.  I have been getting a number of requests... and you gotta give the people what they want! So here ya go!


Bump.  In yo face.  There's no hiding it!

But really, who'd want to?

I guess these ladies....!

http://www.bing.com/images/search?q=history%20maternity%20clothes&qs=n&form=QBIR&pq=history%20maternity%20clothes&sc=0-16&sp=-1&sk=#view=detail&id=DEBBB57F6487A48D0A72DE107ACE501DC2588653&selectedIndex=0
click for source
Although, $1.79 for a "blue fancy smock"?.. I may be able to be talked into that.  ;-) 

Lately I've been feeling...

Great! My blood pressure has been good (we've been keeping our eye on it as I had a couple of episodes of elevated blood pressure at work a while back).  Thanks to all those who I've asked to be praying for that.  It's working!! 

Lately I've been asked....

If we are sharing our boy's name.  We are not.  It's something we decided to keep to ourselves until we can formally introduce him to the world.  But we do have it picked out.  


Lately I've been advised to...

Not go snowmobiling. :-( 
And let Michael do more laundry. :-)

Lately I've been worried about...

Getting all the nursery in order before he gets here! We made some BIG progress this weekend on the nursery though, so I'm beginning to feel more at ease about it.  


Lately I've been excited about....

Meeting our little man.  For so long, 40 weeks has seemed so far away but now that it is getting closer (and I'm feeling more and stronger kicks) I am getting more excited to start getting to know who this little guy is... and kiss on some fat baby cheeks!
 

Crazy how time flies! Next week I will officially reach the 3rd trimester. 

Which is for real crazy. And weird.  And great.  All of which are the three of my most frequently used words to describe being pregnant and on the brink of becoming a mom. 

Um.. also, super excited to be back next week to show you all the bookcase we built! I'm working hard this week to get it painted! 

Don't miss a beat.  
{Follow this blog on Bloglovin'}
 http://www.bloglovin.com/blog/8102735/a-nurse-and-a-nerd 

-or-

{Follow this blog via Email}

Enter your email address:


Delivered by FeedBurner

Sunday, February 22, 2015

Baby's First Planked Wall

A couple weekends ago, Michael and I tackled our first big task for completing the nursery.

The plan was to plank the wall behind the crib.  If you aren't familiar with what I mean by a "planked wall", click here, or scroll on down and read more.

We used a couple tutorials to help us figure out the process - you can find tons of them on pinterest.  House of Smith was the main resource we used.  I would encourage you to read through her's and several others if you are going to tackle the process.

We purchased 1/4 plywood from Lowe's for $14 per sheet.  Apparently, some Lowe's stores will cut the sheets down for you at the store.  Our Lowe's strictly enforces a rule that it will not cut anything smaller than 8 inches.  We wanted our planks at 6 inches in width.  So what's a tablesaw-less couple to do?  We set up some sawhorses and used the guide on Michael's circular saw to make our cuts.  It worked pretty well and honestly did not take that long.  It's best if you have two people - one to do the cutting and one to hold onto the boards because as you cut further into the wood, the cut piece will start to vibrate, which makes getting a straight cut difficult.  

After our boards were cut, I used the power sander and 150 grit paper to quickly sand down the rough surface.  I also knocked off the freshly cut - and sharp - corners of the boards.
This didn't take long either.   I worked out in the garage sanding (wearing a mask, of course) as Michael prepped the room and made some initial measurements.


Once our boards were ready, we started at the ceiling.  Wow were our ceilings uneven.  We had to do some major adjustments to our boards by trying to cut off pieces of wood in order to compensate for slopes in the ceiling.  We got fairly close and then filled the remaining gaps with calk.
Once we got past the ceiling -which took us probably a good hour- things moved pretty quickly.
 

We used two nickles to space our boards.


And Saint Steve lent us his pneumatic brad nailer which was awesome!


He also lent us his jigsaw, which helped when we had to cut our boards for the outlets and near the window trim. 


Once the whole wall was planked, I filled the holes with wood filler, sanded everything and swept it off.

Then I primed it all.  Two coats.
I'm super psyched about how the horizontal lines of the planked walls contrast with the vertical lines of the crib.   I love it!
Although I love the white against wood, we do plan to paint the planks and the walls all the same color.  But before I paint, I will give the planks a light sanding, just to keep the finish soft to the touch. 

 But before I can paint the room, we have another fairly large project lined up...

That corner by the door is wasted space in this little room.  Our thought?  Make it useful by building a book shelf.  Kids have lots of books, right?  It will also have extra deep shelves at the bottom for toy storage.

After lots and LOTS of planning, we started working on it yesterday.  It's probably our biggest solo project to date, so wish us luck!!  We are optimistic that we will be able to finish building it next weekend.... but then again, this is our biggest solo project to date, so we'll see. :-)

Linked to: Pretty Pintastic Party, On Display Thursday, Think&Make Thursday, Talented Tuesday,
 Thrifty Decor Chic-Before & After Party

Don't miss a beat.  
{Follow this blog on Bloglovin'}
 http://www.bloglovin.com/blog/8102735/a-nurse-and-a-nerd 

-or-

{Follow this blog via Email}

Enter your email address:


Delivered by FeedBurner


Sunday, February 8, 2015

Simple and Sweet Valentine's Treat

Valentine's day is less than a week away.

Thankfully, Michael and I decided this morning in the bathroom that we would be each other's Valentines :-)... phew! Glad we got that decision out of the way.  ;-) And usually we spend it pretty low key with a homemade card. We may go out to eat or I may just make a dinner for us at home.  We don't fuss too much over this holiday.


But this week I found this adorable woven heart at a consignment shop in town and couldn't resist the $2.50 price tag!   I replaced the old ribbon it came with with some bakers twine that I had recently gotten on sale at Meijer. 


So I just cut myself a length of string and hung it on the door that we use everyday.


I placed some paper and a marker nearby and everyday this week whenever we leave, we have to write a little note to each other... with the Valentine spirit in mind.


Then by the time Valentine's Day gets here we get to open and read lots of little notes from our Valentine! Simple and Sweet.  That's my kind of Valentine's day!

Valentine's Day Door Messenger


What about you?  Are you more of a big-extravagant-date-with-2-dozen-red-roses kind of Valentine? Or a sweet-card-and-simple-meal kind of person?

Alsoooo......  I can't resist sharing, and if you follow me on instagram you already know...


we started on the nursery this weekend! The initial project?...planking the wall behind the crib! We actually finished it all on Saturday but I want to get it primed at least before I share it with you all.  Just a little sneak peak for today! EEEK! So excited!


Don't miss a beat.  
{Follow this blog on Bloglovin'}
 http://www.bloglovin.com/blog/8102735/a-nurse-and-a-nerd 

-or-

{Follow this blog via Email}

Enter your email address:


Delivered by FeedBurner

Sunday, February 1, 2015

Laura Lately: January Edition

Happy Super Bowl Sunday!!  If you know me at all, you probably know I have very little interest in sports... but I do have an interest in getting together with friends, eating foods with far too much cream cheese to be good for you, and watching fun commercials.  Although, this year, "friends" = Michael and if the baby counts, then him too.  Because right now, it looks like this outside:

Lately I can't get enough of...

The view out our front window! It's beautiful outside and we are expected to get about 16+ inches of snow by tonight! Since I have no place to go, I get to curl up with a blanket, my computer and enjoy the falling snow.  It's perfect packing snow too so I keep asking Michael if he wants to build a snowman (you know the tune).  No snowman has been built thus far.  I'll keep you posted.

Lately I've been watching...

I was all excited because I thought I read that Animal Planet would be live streaming the Puppy Bowl XI online today.  No such luck.  And with no cable in our home, I am forced to spend my day puppy-less.  But I have been enjoying watching a lot of Friends on Netflix!

Lately I've been shopping for...

BabyB! You can check out my pinterest board for all the cute cute things I've been ogling. 

We have been continuing to watch Craigslist for good deals on a changing table/buffet as well as a glider/rocker.  Nothing yet but I'm hopeful we can still score a deal in plenty of time for our little guy's arrival in May.  
Oh and this happened! The crib is in the house ya'll! That's a pretty big deal!!

Lately I've been munching on...

Chicken, Steak, Eggs, Nuts.  Lots and lots of protein.... for a healthy growing boy. 

Lately I've been looking forward to...

My birthday!! I get to turn 27 at the end of this month! I always said I felt like, for me, 27 was the perfect age to become a mom!  So I look forward to turning 27 and start this transition that will surely change my life, heart, mind, priorities, etc.. forever.  

Lately I've been thinking about...

How sometimes its easier to be a care-giver than receiver.  As a healthy 26 year old nurse, I am much more familiar with taking care of patients than being a patient.  In fact, other than going for the routine check ups, I have never really been on the other side of the scrubs.  But this last week changed that.  Long story short, I couldn't be more thankful for skilled and caring doctors and nurses. I especially am super thankful for my own coworkers who took such good care of me when I was not feeling well.  Don't worry, things are OK, just some fluky blood pressure and heart rate issues that seem to stay at bay most of the time.. and go away with rest... thankfully.  I mainly just want to write this out of a grateful heart for my coworkers who sprang into action, making me feel well cared for and reassured.  I couldn't ask for better people to care with and be cared for by. 


Don't miss a beat.  
{Follow this blog on Bloglovin'}
 http://www.bloglovin.com/blog/8102735/a-nurse-and-a-nerd 

-or-

{Follow this blog via Email}

Enter your email address:


Delivered by FeedBurner

Sunday, January 25, 2015

DIY Deadline: Custom Jewelry Trays

There's a deadline looming in our house.  One that will change everything. 

I'm a girl who works best if I have a deadline.  Now there are some out there that may label me a procrastinator.... but, I just choose to say I work well under pressure.  So now that we are past the half way point in this pregnancy, it seems like we need to get down to business and get things done.

There are tons of things I'd like to get done before the baby gets here: the nursery, painting our closet, some outdoor projects, deep cleaning, etc... but one thing I'd like to get done is to finish up some of these looming DIY projects that I have sitting around waiting to be tackled.  So, from time to time, I will be bringing you a post called DIY Deadline where I show you one of these projects that has been sitting around waiting to be completed. 
DIY Custom Jewelry Tray

This time... It's all about these jewelry organizers I have been wanting to make.

Last March, Michael and I were at the Habitat ReStore and I saw a huge stack of shallow drawers.  As soon as I saw them, I knew instantly what I wanted to do with them.  I knew we could make them into jewelry organizers.

So we bought four of them, with the idea that they would fit seamlessly into our IKEA closet system that we had just purchased and assembled.

And then they sat in our basement for 9 long months, waiting for us to get to them.

One of the biggest issues was how we were going to transform them from empty drawers into organized jewelry trays. 

Then this Christmas we decided to invest in a beautiful and magical piece of equipment called a miter saw.  Once this wonderful machine entered our home, the answer was clear. We'll cut some scrap wood and glue them down to create dividers.

So working on this project became a nice excuse for Michael to play with his new toy. 


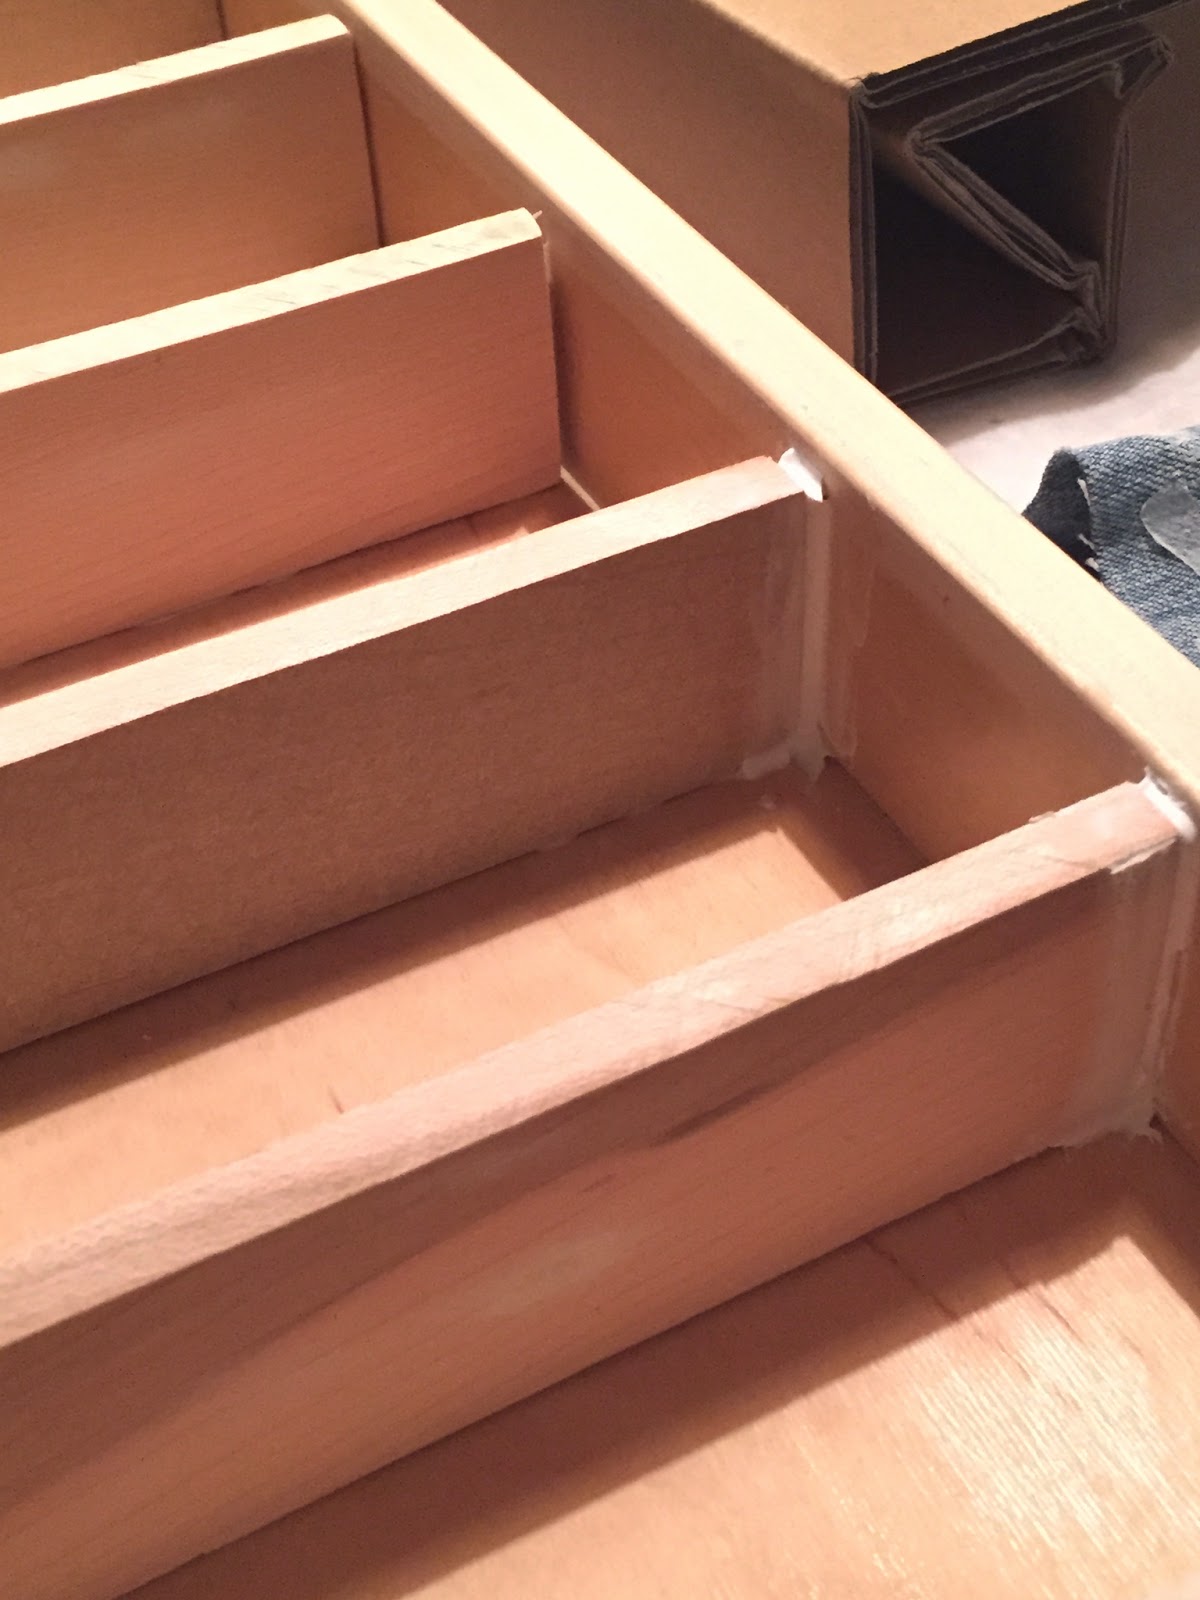
Here is the before...(The bottom one was an old bamboo kitchen drawer organizer that we used in our old apartment kitchen drawers, but no longer need in our new kitchen. The top were the shallow drawers that we got from the ReStore) 

 ...and here are the new jewelry trays...


To do this, Michael sanded and cut some wood trim that he found at the ReStore to make the dividers and then glued them down with liquid nails. Some of the gaps were a bit large so we just used some caulk to fill them in. 

Then I painted them.   ....three times... that was fun. 

I mixed up some chalk paint using this recipe, that way I didn't have to sand or prime them. 

And here we are!
DIY Custom Jewelry Tray


DIY Custom Jewelry Tray

Each drawer cost us $2 since we bought them on a 50% off day. The tray separators were made from wood trim we also picked up at the ReStore for around $6 total.  So for all 5 custom drawer jewelry trays, we spent $14!

Looking online, you can spend anywhere between $10-25 a tray.  So I'm thinking we saved about $40 some bucks by making them ourselves.

DIY Custom Jewelry Tray, IKEA PAX system

 And I love how they fit in my closet. 
DIY Custom Jewelry Tray, IKEA PAX system
I put felt pads on the bottom of them and just slide them out when I want a piece further back in the tray.  I love them!

One Project down.... lots more to go!

linked to: On Display Thursday, Week's End, Thrifty Decor Chic -Before & After Party
Don't miss a beat.  
{Follow this blog on Bloglovin'}
 http://www.bloglovin.com/blog/8102735/a-nurse-and-a-nerd 

-or-

{Follow this blog via Email}

Enter your email address:


Delivered by FeedBurner


Sunday, January 11, 2015

Nursery: The Great Scout-Doorsman

Hi All! What a fun week it has been finding out the gender of our little one -click here if you missed the reveal. Now that we finally know it is a boy that will be joining us in about 20 weeks (gahhh!!), it's time to get going on the nursery and preparing for his arrival.  

I have known for a while that if we had a boy that his nursery would have a pretty strong campy, outdoorsy, woodsy, Boy Scout-y theme.  Why that in particular?  Well the daddy of this little guy, Michael, is an Eagle Scout.  And so was his dad.  What a fun way to honor that tradition than welcoming the next generation into a home surrounded by all things Scouting.  And it's just plain fun! 

So lets look at some of the details I am cooking up. 

Boy Scout, Camping, Woodsy, Woodland Nursery Mood Board


1. Lantern Light 
A classic lantern would certainly set the mood of the room, as it usually does.  I love this camp-like lantern pendant. 

2. Benjamin Moore Nantucket Grey
I am still unsure of what color we may go with but this color by BM may be a good option.  I like how it is kind of an army green/grey.  I also think a khaki color may work.  We'll see.  Overall I think that the color scheme for the room will be khaki, army green, navy, with pops of red. 

3. Crib sheets
Oh my goodness.  These crib sheets are so so cute.  And there are so many cute woodland themed sheets on etsy.  It was hard to just choose one to highlight.  We went and started to register this weekend and found nothing at the store that would work with our theme.  So it looks like ordering them online will be the plan for our crib bedding.  

4. Curtains
I like to make my own curtains in general and I have some ideas cooked up for some cheap DIY curtains for our little guy's room.  I like these canvas grommeted curtains but I think I can make my own....with a fun little spin on it.
 
5. Mountain Pillow
I'm all about adding whimsical little touches like this pillow to keep this room from becoming too serious. 

6. Rug
Texture is important.  And a soft rug will be a must for our boy as he grows and starts to play on the floor of his room.  So I really like this soft faux sheepskin rug.  I also like the price a lot.  I am just concerned about keeping it clean...

7. Boy Scout/Vintage Camping Art
Michael got all of his Boy Scout stuff out this week and was showing me a lot of it.  He even has some of his dad's old stuff... which was really fun to see.  Old books, old merit badges, and lots of memories.  I'd like to think of a clever way of displaying some of it in the nursery.

8. Felt campfire
This. is. so. fun.  And I want it!

9. Slipcovered Glider
Gliders and ottomans are crazy expensive.  So I am exploring different options for getting/making a slipcovered chair for the nursery.
 
10. Jenny Lind Crib & a Planked Wall
I love the jenny lind style cribs.  I like their simplicity but nod to vintage.  So we will be purchasing a wood stained version.  Behind the crib I'd like to plank the wall to add a different texture and bring a cabin-y feel to the room. 

11. Clever Storage
I just love how Lisa added this fun diaper storage to the side of the changing table that is not only functional but cute! Update: Michael just told me that those diaper bins are buckets from an old grain bucket elevator...which is so cool because that's what Michael does for a living!! He designs and engineers grain processing equipment! Now I really love them! Maybe I can find some similar ones somewhere...

12. Dresser Changing Table
We are on the hunt for a great dresser for our changing table.  Wood stained, straight lines, with lots of drawers would be great.  I also love how Lindsay hung these wire baskets above it for storage.  So cute. 

So that's where the plans are for now! I will keep you updated as things progress!

Don't miss a beat.  
{Follow this blog on Bloglovin'}
 http://www.bloglovin.com/blog/8102735/a-nurse-and-a-nerd 

-or-

{Follow this blog via Email}

Enter your email address:


Delivered by FeedBurner

Tuesday, January 6, 2015

Baby Blough's Gender Revealed!

Well I was planning to not reveal this until Sunday but Pinterest has spilled the beans.  Apparently, I was trying to make a secret board for the new baby that wasn't so secret. oops!

So in case you didn't already find out via Pinterest.... are you ready?....


Well I was right... and so were the old wives! We're having a boy!!


And we couldn't be more excited about the trucks, soccer balls, bugs, and bow ties in our future.

More on our plans for the nursery coming soon. Thanks again for all your encouragement and excitement as we continue on this journey. 

Don't miss a beat.  
{Follow this blog on Bloglovin'}
 http://www.bloglovin.com/blog/8102735/a-nurse-and-a-nerd 

-or-

{Follow this blog via Email}

Enter your email address:


Delivered by FeedBurner