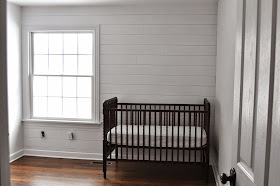
The plan was to plank the wall behind the crib. If you aren't familiar with what I mean by a "planked wall", click here, or scroll on down and read more.
We used a couple tutorials to help us figure out the process - you can find tons of them on pinterest. House of Smith was the main resource we used. I would encourage you to read through her's and several others if you are going to tackle the process.
We purchased 1/4 plywood from Lowe's for $14 per sheet. Apparently, some Lowe's stores will cut the sheets down for you at the store. Our Lowe's strictly enforces a rule that it will not cut anything smaller than 8 inches. We wanted our planks at 6 inches in width. So what's a tablesaw-less couple to do? We set up some sawhorses and used the guide on Michael's circular saw to make our cuts. It worked pretty well and honestly did not take that long. It's best if you have two people - one to do the cutting and one to hold onto the boards because as you cut further into the wood, the cut piece will start to vibrate, which makes getting a straight cut difficult.
After our boards were cut, I used the power sander and 150 grit paper to quickly sand down the rough surface. I also knocked off the freshly cut - and sharp - corners of the boards.
This didn't take long either. I worked out in the garage sanding (wearing a mask, of course) as Michael prepped the room and made some initial measurements.
Once our boards were ready, we started at the ceiling. Wow were our ceilings uneven. We had to do some major adjustments to our boards by trying to cut off pieces of wood in order to compensate for slopes in the ceiling. We got fairly close and then filled the remaining gaps with calk.
Once we got past the ceiling -which took us probably a good hour- things moved pretty quickly.
We used two nickles to space our boards.
And Saint Steve lent us his pneumatic brad nailer which was awesome!

He also lent us his jigsaw, which helped when we had to cut our boards for the outlets and near the window trim.
Once the whole wall was planked, I filled the holes with wood filler, sanded everything and swept it off.
Then I primed it all. Two coats.
I'm super psyched about how the horizontal lines of the planked walls contrast with the vertical lines of the crib. I love it!
Although I love the white against wood, we do plan to paint the planks and the walls all the same color. But before I paint, I will give the planks a light sanding, just to keep the finish soft to the touch.
But before I can paint the room, we have another fairly large project lined up...
That corner by the door is wasted space in this little room. Our thought? Make it useful by building a book shelf. Kids have lots of books, right? It will also have extra deep shelves at the bottom for toy storage.
After lots and LOTS of planning, we started working on it yesterday. It's probably our biggest solo project to date, so wish us luck!! We are optimistic that we will be able to finish building it next weekend.... but then again, this is our biggest solo project to date, so we'll see. :-)
Linked to: Pretty Pintastic Party, On Display Thursday, Think&Make Thursday, Talented Tuesday,
Thrifty Decor Chic-Before & After Party
Don't miss a beat.
{Follow this blog on Bloglovin'}
Enter your email address:
Delivered by FeedBurner


No comments:
Post a Comment
I'd love to hear what you have to say. Questions, comments, advice...Think of this as your invitation to add something to our blog.