Navbar

Image Map

Sunday, May 4, 2014

Housiversary House Tour!

Happy Home Ownership Birthday to us! It was one year ago yesterday that we closed on our home.  We spent six months renovating this bad boy (girl?).  What a ride! We were really hoping to have some type of spring open house, but you know how life goes.... quickly! So until we can get ourselves around and plan that, I am throwing a virtual open house and inviting you all! So come on in, grab some imaginary cheese wedges and punch, and take a look around!

Here is an overview of the before layout and the after layout just to help you visualize.


Exterior.

We re-sided the main part of the house (not the garage since that will receive additional renovations later). We cut down three big walnut trees and ripped out some overgrown shrubs. We replaced/updated the railing on the portico.  Switched out windows.  On the back side of the house, we removed the exterior door that went into the kitchen. 


The Plan:
-Landscape, landscape and more landscape (if you have any ideas for the hill out front please let me know!)
-Front Porch:  The goal is next spring to add a new roof (we need it desperately) and then add the wrap-around porch

Foyer.

We added an overhead light and upgraded the trim.  We added hooks for coats.  We also switched out the front door and the door to the upstairs. 

The Plan:
-Paint
-Add console table, accessories, art/mirror
-Eventually, knock the wall down to reveal the stairs and railing. 

Living Room.

We removed the window to the left of the fireplace.  Added trim to mantel and installed a beefy wood mantel.  We knocked down the wall to the kitchen and then widened the opening into entryway. We upgraded the window and the opening trim.  We removed the carpet and refinished the floors throughout the house. 
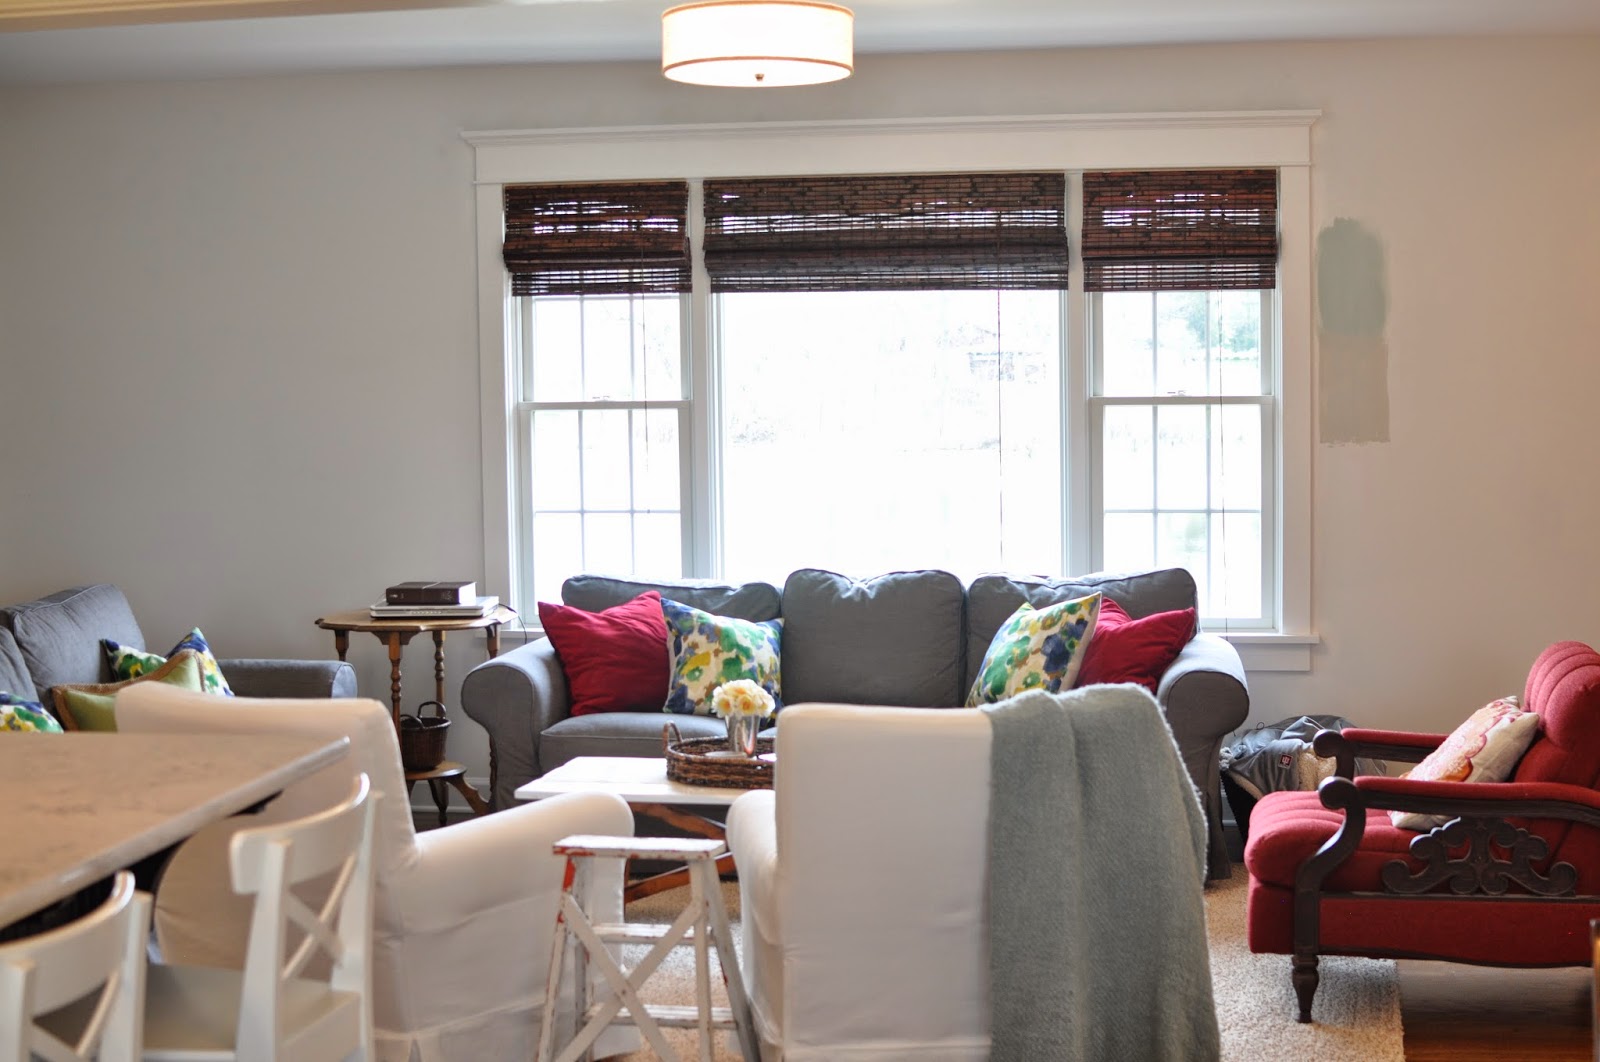


The Plan:
-Paint
-Add light and airy drapes
-Purchase fabric/pillows so they all go together
-Rework the coffee table - paint, upholster, buy new?
-Side tables, lamps, sofa table
-Mount TV
-Hang artwork
-Eventually, we'll add built-in bookshelves around fireplace (for now, add matching dressers on both sides of fireplace)

Dining Room.

 We upgraded the trim and light fixture.  The wall between the dining room and kitchen is gone.  We added beadboard wainscoting to tie the two rooms together.  We upgraded the door that leads to the garage.  
 The Plan:
-Paint Door
-Refinish Table
-Replace some of the more rickety chairs
-Add rug

Kitchen.

The kitchen was closed off from the rest of the house so we opened up two walls.  We nixed the soffit and the door leading to the outside.  We closed off the doorway to the hall in order to make room for the refrigerator. We added hardwood to the kitchen to create a better flow from room to room.  Added an island.  The appliance layout was basically kept the same.   
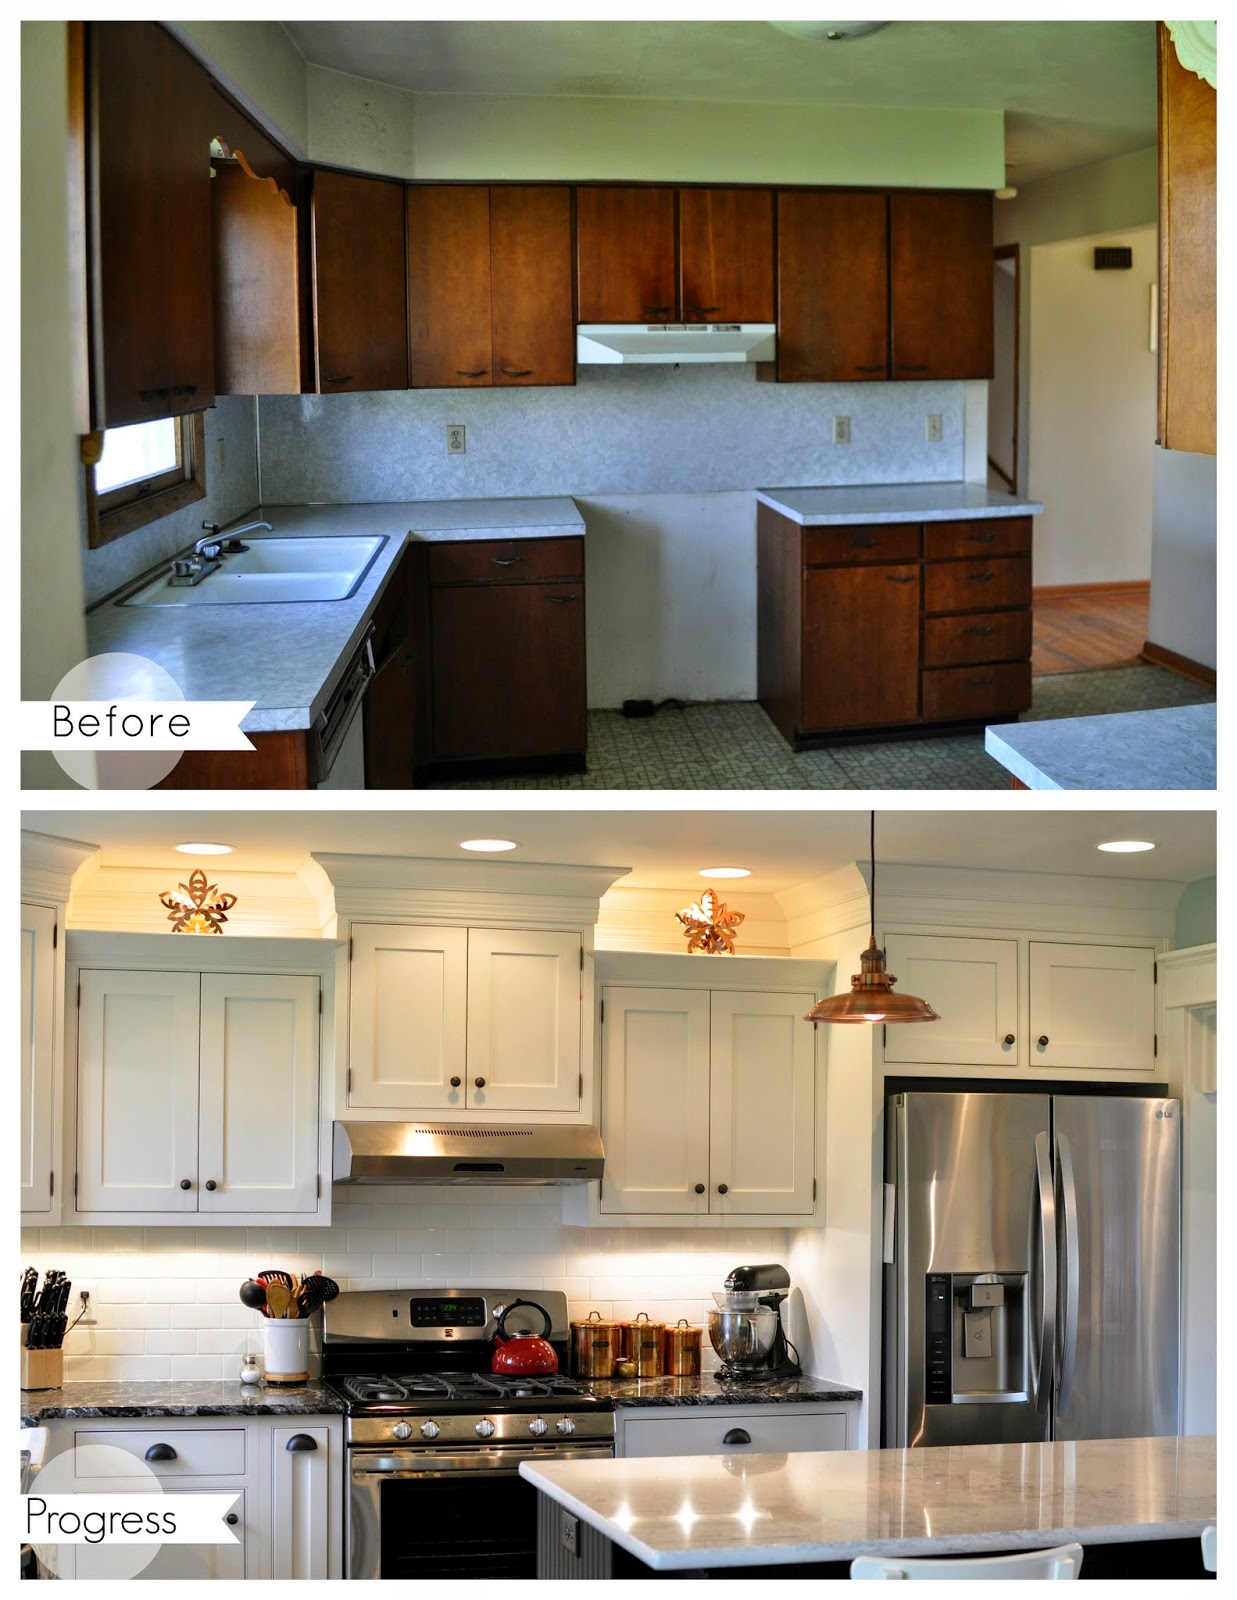
Taken from the exact same angle this pictures shows what a difference taking down two walls can make!
 

The Plan:
-Nothing.  Its perfect, I'm never going to change it. ever.

The Hallway

This hallway had 8 doorways.  8.  And it was not a very big hallway.  We got it down to 4 doors.  We closed off the entrance into the kitchen, bathroom, and two closets.  We upgraded the trim and doors.  I also think that this picture most clearly shows difference between the floor before it was refinished and then after.  Goodbye orange, hello chocolate! (Technically it is called jacobean, if anyone is interested).
 The Plan:
-Paint
-Add art to the wall

Guest Bedroom/Office/Future Nursery.

 This room was originally the master bedroom.  And it was a pretty good size.  But it was not connected to the bathroom and we decided that it was more important for us to have a master suite on the first floor than it was to maintain the current layout.  So we stole part of this room for our master closet and created a new closet for this room. It has drastically decreased the size of the room but it is still a great size for an office or nursery.  Plus the view from the front window is pretty awesome--lucky babies.


View form the office/nursery window

 The Plan:
-Paint
-More permanent and purposeful furniture
-More interesting light fixture

Master Bedroom.

 Originally this was the smaller of the two existing bedrooms but we widened it by absorbing some inefficient closets from the old master bedroom, hallway and bathroom. We added a door from the bathroom to the new master bedroom and we added a master closet. 


 The Plan:
-Paint
-Add throw pillows, down comforter/duvet? 
-Patterned Drapes
-Find an old pie safe/glassed cabinet to store linens (Where the white chair and side table are currently)
-Art work
-Add a rug

Master Closet.

We created the master closet from scratch by taking some space from the old master bedroom.  The closet organization system is from IKEA and then my uncle built shelves for boot storage.  Who's got two thumbs and is one lucky girl?...
... This girl!!!

The Plan:
-Touch up paint
-Paint trim
-Add a more exciting mirror
-Figure out some way to store jewelry

Master Bath.

The master bath got reconfigured from the vanity being on the south wall to being on the western wall.  We absorbed more inefficient closets (this house had a large amount of small closets in a concentrated area) to create a larger bathroom. We utilized that extra space to add a clawfoot tub (remember our tub that we scored on craigslist and that we christened Harriet?) and a walk in shower.  


 The Plan:
-Adjust paint color, repaint (the pictures don't show how bright the color is in person, a bit too teal for me)
-Build shelves above bump out
-Add artwork


Well ladies and gentlemen, that brings us to the end of all the Phase One projects.  Although, I didn't mention that we tore off all the old plaster walls, put in all new insulation, added new drywall and new trim everywhere, upgraded/reworked the plumbing, and added a geothermal unit for heating and cooling.  We are super thankful for Saint Steve who was here as much, or more, than we were for 6 months! We have said it before but we will say it again, we could not have done it without him!!! My brother-in-law and his dad did our tile work and we are so grateful for their skills! And then for all the rest of our friends and family that helped us:  We are so thankful and so loved and so thankful for the love.  Tears.

If you are interested, here is the rest of the areas of the house that we have not gotten to yet.

Garage.


  The Plan:
-Convert current garage into 1/2 bath and mudroom
-Build new garage off of old garage
-Pave driveway

Basement.

Previously the basement was "finished" but we demo'd it since it was in such gross shape.  We grinded the floors and painted it with Kilz to get rid of a bad, bad pet smell.  
  
The Plan:
-Finish it.
-Movie/Media room:  Add big sectional, storage around fireplace,
-Laundry room: tile, add cabinets and counter for folding clothes, storage shelves
-Bathroom: complete gut job, possibly change tub shower into standing shower
-Pool table room: light fixture, some boilermaker pride (of course)
-Area around walkout basement: tile, build in storage for crafting supplies and toys, large table for crafting/ parties, cabinets and mini fridge for parties and convenience

Walk out Patio.


 The Plan:
-Build porch over top
-String twinkle lights underneath
-Possibly add an outdoor ceiling fan underneath
-Add fire pit nearby

Attic.


 The Plan:
-Finish it.
-Two Bedrooms
-One bath
-Possible open area for computers/studying
-Plenty of built in storage to optimize use of knee walls

Phew! Are you getting nervous or overwhelmed yet? Because I am! But more than that I'm getting excited and motivated! One thing at a time, that's how Michael and I cope.

It has been so much fun for me to go back and prepare the before and after pictures for this blog post.  At times it can feel like we are making very little headway in the grand scheme of our plans. But when I look back at these pictures and remember how things looked (and smelled), well, it feels really good.  Michael and I think back often about where this year has taken us and what it has taught us.  Good things.  So many good things.

I think May, in general, tends to be a month of reflection for Michael and I.  Not only is it now our Housiversary month, but it is also our Anniversary month.  And like last year, in a couple of weeks I will be back with a post about the best stuff from this last year of marriage.

Thanks for stopping by to our virtual open house! We are so happy to have had you! What was your favorite part of the tour?  Was it the imaginary cheese (I'm sure you imagined yourself up some yummy local Guggisberg Cheese, right)?  My favorite before and after might be the hallway... surprisingly. I just love those new floors! Michael's favorite is the view from the living room into the kitchen without the walls - so open! 

Don't miss a beat.  
{Follow this blog on Bloglovin'}
http://www.bloglovin.com/blog/8102735/a-nurse-and-a-nerd

TDC Before and After


That DIY Party link party at diyshowoff.com

Sunday, April 27, 2014

Las Vegas Light


When Michael's sister moved out to Las Vegas last August, we were sad to send her off to such a far away place but we also thought... Score! An awesome excuse to go on a Vegas Vacation!

But here's a fact that probably won't surprise you: Vegas has never been high on our list of places we have wanted to go.   But, guess what?  We loved it! So let me tell you about how we did Vegas, Blough Style...We'll call it Las Vegas Light. 

We are super thankful for having Jenelle and Junior host us for the week.  They were gracious hosts for allowing us to stay at their apartment and show us around their new stompin' grounds.


The nicest part about this vacation was it was was super chill.  We only had about three things that we absolutely wanted to do and see: See Jenelle's classroom, go to the Hoover Dam, and see the Las Vegas Strip.  So it was really great to spend 5 days doing those things and then casually deciding how else we were going to spend our time in Vegas.

The first full day of the trip we went to the Hoover Dam. Guess whose idea that was?  Yep! The other half of this blog's name: the nerd.

But it's not like I was against it! We had heard so many people say good things about the Hoover Dam, we just had to check it out.

It's only about an hour from Vegas so it is an easy day trip to make.  We highly recommend the extended tour.  You get to go deep inside the dam and the tour guide we had was fantastic! Well worth the $30 per person - especially if you are someone interested in engineering or American history.  Or if you are just a person. You'd probably like it too.  It was really good.
Although, I don't know if we can give quite the same blanket rave reviews about the museum that they have before you go on the tour.  It was hit or miss.

 Nerd Approved. 
 
Non-nerd not-so-approved. 

On Monday we went to Jenelle's classroom.  She teaches the 4th grade.  She won most creative for her "magic tree house" door decorations! Congrat's girl! I'm sure Ball State will be calling soon to film you and your door for one of those Education Redefined commercials.  Better keep the line open.

But seriously.  I love the ladder.  
It was really fun to see her classroom and hear about her kids.  It sounded like she has learned a lot this first year as a teacher.  The picture on the right is Jenelle and some of her reading buddies that she has for the kids to use during reading time.  Have you guys ever heard of Skippyjon Jones?  Neither had we but there may or may not have been an impromptu reading time in the classroom where we were introduced to him (the actual 4th graders were on spring break, it was just us).  I like him....for being a cat, or was he a chihuahua?  I'm still a little confused about that. 

Another thing we did was hit up some thrift stores in Vegas.  You know me, I love a good thrift store but it was a bit frustrating when the only thing feasible for me to buy needed to be able to fit in my suitcase.

But boundaries are probably a good thing to be added to my life so... I bought this scarf.  Because, you know, I have only, like, a couple (or 10) scarves.  Boundaries.  And wouldn't you know we just didn't have room in the suitcase for Michael to buy this shirt he found.  Darn suitcase weight restrictions! 

Ain't no boundary high enough or far enough to keep me from a ReStore! And look at this one we found in Las Vegas! And oh the things I would have purchased if I could have fit them on the plane!...
So. Much. Good. Stuff. SO MUCH! If you live in Las Vegas, would you do me a favor and go buy all the photo'd items.  The varying shades of sea glass tiles, the adorable coffee mugs, the lockers, the coolest headboards, this mirror, a $150 west elm pebble rug, this storage ottoman, and these tufted stools.  *Sigh* I have to move on now because I'm getting sad...

One night we went to Old Downtown Las Vegas on Fremont Street.  The cool thing about Fremont Street is that several blocks of the street are covered in a canopy of light bulbs that produce a dazzling light show.

The bad part about Fremont Street was that there were a lot of other "shows" going on (not pictured), if you know what I mean.  Was Downtown Las Vegas cool to see? Yes.  Would I go back next time I'm in Las Vegas?  No.  Not really our scene.

The next place we went was much more up our alley.  It was my favorite part of the trip.

Jenelle casually mentioned, "oh yeah.  There is this place called Red Rock Canyon that some people recommended.  They said there is a scenic drive that is really pretty.  I think it will only take about an hour once we get there.  Then we'll head to The Strip for the rest of the day."

"Ok!" we all agreed. 

Well none of us were expecting this.
This beautiful mountainous, desert-ous park! Oh if only we had packed our hiking shoes!!
Nevertheless, we made the most of what we were able to do!

 Can you tell we were blissfully unprepared for our surroundings.  


Red Rock Canyon?... We WILL be back WITH our hiking shoes.

Five hours later,on our last night in Vegas, we finally ended up on the Las Vegas Strip.   The first thing we did was hit up Madam Tussauds's Wax Museum.
Wax Museums = taking ridiculous pictures= our idea of a good time.
There were just too many so I had to pick my favorites. Because this blog post is getting out of hand.
After we were all cheesed out, we hit the strip.  We saw the volcano show at the Mirage.  We ate gelato at the Venetian.  We stood in awe of the beautiful hotels and their gleaming chandeliers.
I had to pull my one dollar bill out of a kiwi that some street magician had magically placed there. Wish we had gotten a picture of that! We saw Caesar's palace and all the anatomically correct statues. 
And we finally ended up at the Bellagio's fountain show.  We did not see all of the strip because we were exhausted, thirsty, and frankly, getting a little h-angry.
So we stopped at the stand-out restaurant from the whole week. Lola's - A Louisiana Restaurant.  We sat outside and we did what I always love to do when a vacation is coming to an end.  We played the favorites game.  Favorite activity, favorite thing you saw, favorite food, favorite hilarious moment. It helps to seal the memories, I think. 

Have you ever been to Vegas?  To the Hoover Dam? Red Rock Canyon?  How do you seal up your memories at the end of a trip? 

Don't miss a beat.  
{Follow this blog on Bloglovin'}
 http://www.bloglovin.com/blog/8102735/a-nurse-and-a-nerd


Sunday, April 20, 2014

Come to the River.

 Peach Bud 2014 Update: I keep forgetting to pass on the bad news about the peaches.  Sorry guys, those little peach buds are toast.  Thanks a lot mother nature. 

If you don't know what that means, read this post.
__________________________________________________________________________________

Happy Easter Everyone!

Today, I thought I would share the special art project Michael and I have been working on for the dining room.


I will post the tutorial later (lots of funny things) but I wanted to talk about the meaning behind this today, on Easter.

The words are from a song by the Rhett Walker Band, here is the music video.

If you can't see the video, here is the link. 

It's a song I heard for the first time our church awhile back and just loved it.  What a perfect message and fitting theme for our home...since, after all, we are on the river.

But, as you can probably guess, the meaning is a bit deeper than that...

The word Fulfillment became a keyword for me in college. One of the biggest questions I had during this time was "Where in my life do I find fulfillment?" Reflecting on this question, I didn't find the answer in my school work, or my job, or the things I had, or my friendships, or even in Michael.  There was really only one answer I could find that left every want and desire of my heart filled. 

Jesus replied, “Anyone who drinks this water will soon become thirsty again.  But those who drink the water I give will never be thirsty again. It becomes a fresh, bubbling spring within them, giving them eternal life.”
John 4:13-14

So this little plaque on the wall? It is there as a reminder, that when I drink from the cup of Christ, I will thirst no more for the things that cannot truly fulfill me. Because only He is enough to quench the truest desires of my heart.
Praise be to the One that died for us and Hallelujah because He is risen!


Happy Easter.


Don't miss a beat.  
{Follow this blog on Bloglovin'}
 http://www.bloglovin.com/blog/8102735/a-nurse-and-a-nerd

Sunday, April 6, 2014

Finding a Vision

So I had a couple of different ideas about this week's blog post.  But then I got this question from Ashley:


"I was going to ask you how you come up with a vision for a room. I've started keeping a folder of ideas, but I'm not sure where one goes from there. Did you draw your plans up? Did it come together gradually as you went?"
What an awesome question! And thanks for asking it Ashley! I would say yes, as you guys who have been following this blog for a while now know, it definitely comes together gradually. 
I'm no interior designer, and I also don't think you have to be one or have to have one to have a beautiful home.  What you do have to have is a vision.  Here's how I get mine...


1. Devour images.  

This one is a no-brainer (and one you are already doing Ashley!).  Ever since I was little I remember loving houses. I had a house plan catalog that I looked through over and over again picking out my dream homes.  I used to -still do sometimes- steal my mom's Better Homes and Gardens and Country Living magazines and claim them as my own.  But now, I mainly get my inspirational images from Pinterest, Houzz, and blogs (Young House Love, Hooked on Houses, The Lettered Cottage, and View Along the Way just to name some of my favorites). 

2. Like what you like. 

The nice thing about pinterest is that you can save any image that strikes you.  For me, I have a board for every room/area of the house: kitchen, bath, bedroom, living room, dining room, basement, entry/mudroom, laundry/craft.  Not to mention a board for furniture/lighting and fabric/paint/tile.  So as I have accumulated images that I like on these boards, I am "pin" pointing my style.  I can go in, look at the collection of images and look for repeating elements of things that have caught my eye.  A good example of this is my bathroom pinterest board.  I have pinned a whole lot of white subway tile, a whole lot of white beadboard wainscoting, and a whole lot of old farmhouse touches.  A girl likes what she likes.  And by creating a pinterest board that is focused on one room, I was able to narrow in on elements (subway tile, bead board, and farmhouse touches) of the room that I am really drawn to - these are the things I incorporated into the room. 

3.  Use your words. 

 If you look at my living room pinterest board, you might notice that it does not have a nicely organized theme like the bathroom board does.  So what's a girl to do if she pins away and doesn't find a good direction?  Ask yourself how you want the room to make you feel? How do you want others to feel in the room? My answer:  I want it to be casual, comfortable, light.  With those words in mind, I move forward.  We needed furniture?  We bought a slipcover sofa and love seat because, well, it doesn't get much more comfortable and casual than slip covered furniture.  We did buy the charcoal-ish grey color, which is not so much light as it is dark, but we can balance it out with light colored pillows, a light rug, and a lighter wall color, not to mention plenty of lighting - natural and otherwise. 


4. Know the room.  

Every room of our house comes with it's own challenges and quirks. To help me find a direction for our living room, I have to know the room - focal points, strengths, weaknesses.  Knowing these things about the living room allows me to come up with a game plan for highlighting the strengths and remedying/hiding the weaknesses.

Focal point: Front window view of the river, TV (cringe.), and fireplace.  We arranged the furniture in such a way that allows you to enjoy any of the focal points.

Strengths: Open to the kitchen and dining room - great for entertaining.  Pretty molding around openings and window.  Fireplace. Great view.  We will be coordinating the color schemes with the kitchen and dining room to ensure the rooms feel connected and congruent.  We definitely plan to paint the walls -this will make the molding pop!  We also enhanced the fireplace mantel to give it more presence.

Weaknesses: Slightly narrow. Difficult to find a place for the TV.  No storage.  
 

Since the room is slightly narrow, we purchased fairly petite furniture to save on space.  I have been fighting the idea of putting the TV directly above the fireplace, but to maintain symmetry, I'm afraid I have no choice.  Some day we plan to build book shelves on both sides of the fireplace to increase storage.  I also like the idea of storage ottomans and some type of console to store things in.  Then of course there are decorative boxes and baskets that help too.  I'm on the hunt....


5.  Find a jumping off point for color. 

The one that does it best is Sarah Richardson.  She's my favorite designer.  She has an HGTV show called Sarah's House.  Have you seen it?  Oh I've watched each season probably three times.  At the beginning stage of designing a room she, and her sidekick Tommy, will find one fabric and then work the whole room around that.  Many times, my first instinct is to pick out my paint color first.  Don't do it Laura, you'll just regret it girl. So this time, with the living room, I didn't.  I went neutral with the furniture to start with and then I've been searching for something to inspire me.  I looked at fabric for window treatments but have been coming up short.  Then, the other day, I found pillows on etsy.com at a shop called Pillow Fight. The great thing about this pillow is, is that it has awesome colors that can be pulled out in other ways - my jumping off point.


6. Texture, pattern, shine, fun.

Furniture and color do not make a room.  To me, a truly interesting room has a mixture of patterns, textures, and finishes.  And lets not forget to add something fun that makes people know it's yours!

I love the beadboard texture intermixed  throughout our home. The pattern in our dining room curtains makes me smile.The mixture of the oil rubbed bronze, stainless steal, and copper finishes that are in our dining room and kitchen bring a nice shine.  And the fun?... well, I'm working on that. 

So I hope that helps Ashley! I would say those are my basic processes for going about decorating a room and finding a vision.

What are your tips for finding a vision for a room?  What is usually your jumping off point?  What are three words that you'd like to use to describe your home? 


Don't miss a beat.  
{Follow this blog on Bloglovin'}
 http://www.bloglovin.com/blog/8102735/a-nurse-and-a-nerd