Navbar

Image Map
Showing posts with label Renovation. Show all posts

Sunday, April 30, 2017

Our Phase 2 Addition: in a nutshell

It may have been a long time since I have blogged, but that certainly doesn't mean that things have not been changing around here.

Last time I posted, I announced that we were embarking on a big addition....and it wasn't a baby.  We planned to add on a mudroom and garage.  But before I get into that, I thought I'd go way back to when we first bought our house to show you what it looked like.

Yikes! That looks pretty gloomy.  And it was. 

This was the first picture we ever took of our house.  We first looked at it in December 2012 and didn't closed until that following May.  It was quite the process, but I won't get into that.

Here are a few pictures we took the day we closed on the house.


Initial improvements included ripping out overgrown bushes, cutting down rotting trees, and replacing the windows and siding.
We knew we were going to eventually add on a garage and porch so we left some things as is.  On the the old garage, we left the white siding and the front gutters.  We also planned to replace the roof in the next phase so that the shingles would all match.  The old wrought iron railing was scrapped and it was replaced with wood railing, that I painted white.

And that's pretty much how our home looked for 3 years before we started demolition last July.


Let's zoom on through with a little month by month update for you:

August:

Foundation and framing of garage
 

September:

More framing of garage
 

October:

Windows, porch framing

November:

Pour concrete, continue to frame porch
 

December:

Complete framing, new roof, garage door installation, start siding


January:

Complete siding, install lighting, railing and skirting

February/March: 

 Odds and ends getting finished up like the railing, post wraps, the driveway. 


And here is today:
We still have a number of things to do... a few more post wraps, planting grass, stain the porch floor and stairs.  And then of course there is one very obvious thing we need to do:  The Landscaping... which we don't think will happen until next spring.  But we do plan on working on putting in a stone retaining wall this summer (hopefully).


Here's a side-by-side comparison with the house when we first bought it:


Does it look like the same house?

No? I'm ok with that.  :-)


Another side-by-side comparison for you.

I can't wait to get some flower boxes and some hanging ferns out this summer.  

If you have followed this process closely, you may be wondering why we ended up adding the porch on.. because, going into this project that was not the plan.  We thought we were just going to add on the mudroom and the garage and wait to add the porch later on down the road.  Long story short, it just made sense to proceed with the porch now, considering some of the changes we were making to the house. And man am I glad we did. 

It is amazing how much more enjoyment we are getting out of our home with our new addition... especially the porch.  I knew that a big garage would be great, I am just a little surprised to the extent I love having a porch.  I felt sort of trapped inside my house because there wasn't really any place to hang out outside since we bought it.  And now my outdoor enjoyment at home has improved 100 fold! Abe loves to ride his cozy coupe around the drive while I sit on the porch, eating grapes, getting fanned by Michael.  Except not that last part.  Just seeing if you were still reading! ;-) 

We are SO thankful for everyone that has helped us get to the (near) end of this construction project.  We couldn't have done it without some key players: My parents, my Uncle Steve (remember Saint Steve from phase 1 renovation?!), and M2 construction. Big time thanks and hugs for all of them for helping us see this thing through! 

So that's all for today folks! I haven't even gotten into sharing about the inside, there is a lot more to come and I will do my best at updating things more regularly as we progress.  But in the mean time, I am much more apt to sharing via instagram.  For the most up-to-date info, follow me there!

Porch and Garage Addition, Dark Blue Siding, Wrap around porch

I zoomed through 10 months of work, if you have any questions, just leave them in the comments below. 


Sunday, July 24, 2016

Phase 2 Coming at You!

A looooooong long time ago, we had this crazy idea to buy a house and fix it up. 

We finished up Phase 1 in December 2013.  We had gutted our home to the studs and built it back from there.  But there is still so much more work to do.  After our two year "break" from hard core renovating, Michael and I are ready to jump back on the saddle and slap this horse on the behind and giddy up!

It's time for Phase 2: the garage and mudroom.

To refresh your memory, here is what we started with:
So for the last two years now, ever since we re-sided our house, our home has looked like it had a great big white appendage sticking out of it.


We also left part of the front of our re-sided house undone because we were originally planning to build a porch onto the house last spring.  Instead, we had a baby.  :-) So now, here we are, two years later... white garage, blue house, wonkey gutters and soffits..... and super cute baby! So I'm still calling that a win, for sure!

I haven't really talked much about it here on the blog because I've been waiting until we had more of a plan set.

So here's the plan:
1. Build a three car garage onto the front of our home. 
We have gotten a lot of advice from various people who have recommended that we go big... and that we won't regret it!  It is also going to have a second floor with plenty of room for one bedroom and lots-o-storage.

Here is are the plans for the garage.  It will connect to the house on the right through the mudroom.

And yes, my husband is awesome and drafted this whole thing out on Cad.  And yes, he measured everything out that we plan to store in the garage and worked it into the plan.


2. Tear down the current garage and build the mudroom, powder room, and laundry room.
This space is going to be so important for us as a family.  Currently, when people are over, the only suitable bathroom to offer guests is in our master bathroom.  It doesn't bother us, but it does make some people feel weird having to go into our room to get to the bathroom. Further, having a mudroom will mean having coat storage (which we currently do not have) and a floor that will act as a more durable place to track mud and dirt onto - instead of my pretty hardwood floors!

Originally we were not planning to build a laundry room in this space.  But the more I thought about it, the more I felt like we would regret it later if we didn't make it happen now.  I have always done laundry in a basement, so I wasn't really against our previous plans of keeping the laundry in the basement.  But then I had a baby and our laundry increased substantially.  And it is only going to increase as more babies come.  And these babies are going to be on the second floor of the house.  So, I'm sure you can see how having laundry on the main level might be nice.  Additionally, we are adding a very large storage closet, which I'm SO excited about. When we renovated, we eliminated a lot of small closets in order to make more space for our master suite.  I don't regret that decision but it has left us with very little closet space on the first floor.  This closet will make up for it! It will be large enough to act as a broom closet/pantry.  I can't wait!!!

2. Build a second level above the garage and mudroom.
We decided to add a second level to the garage, you know, because, why not?!  The second floor of our home currently is unfinished space.  Eventually, with this addition, the second floor will include 1 bedroom, 1 bathroom, a playroom/family room above the main house.  Then, above the mudroom and garage, there will be an additional 1 bedroom and large storage room.  The area above the mudroom will be a hallway but I think it will actually be large enough to give it more of a function than just a hallway.  I'll figure that out later.  But what I do know is that it will have a laundry shoot from the 2nd floor to the laundry room.  Score!

The picture below is of our plans for the space above the mudroom and the garage.  The doorway all the way to the right leads to the space above the main house. 
You may also notice that there is a stairway from the garage up into that storage area.  We think that stairs will be a nice feature for the future to allow easy access to the storage above the garage.


4. Re-Roof the entire home.
Our roof is over 20 years old and shingles are starting to blow off.  Since we will need to roof the new addition, it seems like the obvious time to reroof the whole house.


5. Landscaping
Michael and I have done very little in the way of landscaping, unless you count cutting down lots of Walnut trees, then we have been VERY active! We wanted to wait until after the garage is added before we put any time, energy, and money into landscaping.  

6. Postpone the front porch addition
Super sad, but we decided that this addition really was not going to gain us enough functionally to have it so high up on the priority list.  So now, the porch will likely come after everything else we'd like to do (finishing the 2nd floor and basement). 

Michael and I started demo by taking off the remaining siding a couple weekends ago.  And now, excavation and foundation work to started this week. EEEK! So excited!

I posted a video of the garage tear down on Instagram if you are interested!

Can't wait to share more about the details and process as we go along!

Sunday, May 17, 2015

The Great ScoutDoorsman Nursery Revealed!

It's a big day here on the blog.  Today's the day I show you what we've been working on since January. 

You all have been with us from the beginning, when we announced our next big project...
pregnancy announcement, construction

And when we shared with you that Baby Blough is a boy!
Gender Reveal, paint can

And now I am happy to announce that we are finished with the nursery well before our estimated construction deadline (and due date) of May 28th.

Remember where I was going with the plans for the nursery?  The Great ScoutDoorsman.

Outdoorsy, camping, boy scout nursery


Well let's see how we did.

Here is where we started.  This room had functioned as our guest room/office.  It was not painted (just primed) and was left pretty much undecorated.

Because why decorate it when we were planning to convert it to a nursery as soon as the time came? 

And the time has come! (insert the I Love Lucy reference here)
Outdoorsy, camping, boy scout nursery


Outdoorsy, camping, boy scout nursery

You may notice that we switched up the artwork behind the crib.  A couple posts ago there was a world map hanging up there with the words "Adventure is Out There" painted on it.  I really liked it there until I started to hang the other artwork up.  Then the colors started to feel really off and the whole room just started to feel very word-heavy.  We had ordered these antique arrows from ebay months ago, figuring we could find a place to incorporate them into the room.  So when we took down the map, I tried to see if they would work in the space as either a mobile or as artwork.  The mobile didn't work out, but I love the way they look up on the wall.  Simple. and Boy. 


Speaking of Simple and Boy.  Check out the quilt.  My friend Emily made it for us!!!
Outdoorsy, camping, boy scout nursery.  Gingham Quilt

It is absolutely one of my favorite things in the room.  Not only does it fit perf.ec.tly in the room, it means so much to us that it was made with love by someone that means so much to us.
 Outdoorsy, camping, boy scout nursery.  Gingham Quilt. Simple Bedding
Outdoorsy, camping, boy scout nursery.  Gingham Quilt

The room's light is something that gave me a big headache.  I bought it at the Habitat ReStore.  I tried several different things to get it to feel right in the room.   I finally got it right when I started threading some twine through the wire in a herringbone pattern.

I wouldn't recommend that project unless you have lots of free time and are looking for a sore neck.
Outdoorsy, camping, boy scout nursery.  Rope Herringbone Light

The curtain is the simplest curtain I have ever made! I'll tell you more about it sometime.
Outdoorsy, camping, boy scout nursery.

The swivel rocker was another element we agonized over.  Buy new? Buy off craigslist?  Well finally, after being failed by craigslist, we decided to invest in a swivel rocker from a local place.  We got to pick out the upholstery and everything #superfancy.  And for only a $30 upcharge, we had it coated with an upholstery protector #supernecessary.
 
Bonus: It's extremely comfortable. 

The wall light is IKEA -I wrapped the shade with more twine and spray painted the finish oil-rubbed bronze. 

Here's the very first thing we bought for the nursery.
Burp Cloth Storage

I guess you'd call it a tool box of some kind, made with some tree branches.  It works perfectly for us to store burp cloths for now and books later on.

Turning counterclockwise in the room is the changing station.
Outdoorsy, camping, boy scout nursery. Changing Station
My mom let us have an old hutch that was my grandma's.  We added some baskets below and on the sides for additional storage.  The top of the hutch was in a bit of rough shape, but nothing a burlap table runner couldn't fix.

We found this old butcher basket which worked out perfectly for the changing pad and other diaper changing necessities.
Outdoorsy, camping, boy scout nursery. Changing Station
 Outdoorsy, camping, boy scout nursery. Changing Station
Outdoorsy, camping, boy scout nursery. Changing Station

Outdoorsy, camping, boy scout nursery. Changing Station
The artwork above is some vintage national parks posters that were available free online for printing.  So we printed them and hung them in IKEA frames. 

Outdoorsy, camping, boy scout nursery. Baby Box
The box is his baby box, already storing memories - like the sign that I used to spill the beans to Michael when I found out I was pregnant!
Outdoorsy, camping, boy scout nursery. Baby Box

And sitting on top of the box is something also very special.  Some of you know that Michael lost his dad when he was 7 years old.  Shortly after, a sweet lady took a couple of Michael's dad's shirts and made them into this little bear that they rightly named his "Daddy Bear."
Outdoorsy, camping, boy scout nursery. Daddy Bear
Michael's mom offered the bear to us for the nursery and I didn't have to think long before saying yes!  It's so special (kiddo won't be allowed to play with it).  I love having something of our little guy's grandpa in the room.


On the opposite wall we hung the adorable little camp signs that were made for one of my showers by my Aunt Janet and Saint Steve. 

Outdoorsy, camping, boy scout nursery. Pallet Wood Camp Signs

 Outdoorsy, camping, boy scout nursery. Pallet Wood Camp Signs
Is that not just the cutest rocking horse?  It is a locally-made piece gifted to us by my friend Kelly.  I just love it! And now Camp Blough can offer an equestrian program!  

The vintage picture is of a bunch of Boy Scouts taken in 1920.  We found it in our attic.  I love looking at all their serious little faces.  I also love how they are holding the American flag backwards in the picture. :-)

Outdoorsy, camping, boy scout nursery. Vintage Boy Scout Photo

Finally, as you walk into the room you'll see that our bookcase is stocked and ready to go!
Outdoorsy, camping, boy scout nursery. Built In Shelves

The baskets below will be great for storing extra blankets for now and toys in the the future.
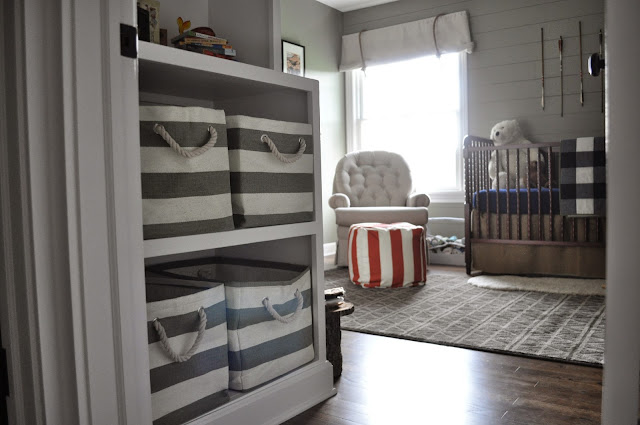
Outdoorsy, camping, boy scout nursery. Storage
 Outdoorsy, camping, boy scout nursery. Built In Shelves. Storage

Above, we have a nice selection of books thanks to so many wonderful friends!  And a couple other nick nacks I've collected.

This metal file drawer was another attic find and is now storing medicine and first aid supplies.  
Outdoorsy, camping, boy scout nursery.

Outdoorsy, camping, boy scout nursery. Built In Shelves
That little car is actually Michael's dad's pinewood derby car from when he was a Boy Scout.

And a lot of the Boy Scout books were either Michael's or his dad's. 
Outdoorsy, camping, boy scout nursery. Vintage Boy Scout Book

I also found this printable that summarizes everything I'm feeling.  Every time I read it, there are tears.
Outdoorsy, camping, boy scout nursery. As soon as I saw you I knew an adventure was about to happen.

Around the corner you remember the chalkboard that I painted and wrote out the Boy Scout Law.  And that canoe up top?... just something that my mom had.  Who just has stuff like that?!  
Outdoorsy, camping, boy scout nursery. Boy Scout Law. Built In Bookshelf.  Chalkboard.
 I will show you how we organized the closet some other day. 
Outdoorsy, camping, boy scout nursery. Boy Scout Law. Built In Bookshelf.  Chalkboard.
How about that adorable little felt campfire set that my sister gave us?! Also note the felt s'more and felt marshmallow on a stick.  How fun is that?! The twig stars were made by my Aunt Susie and Uncle Jace.  They used them to decorate their shower gift and I told them I knew I could find a spot for them in the nursery. 
Outdoorsy, camping, boy scout nursery. Play felt Campfire.  Twig Stars.

We are thrilled with how everything has come together!  But here's the thing, what I love most about this room is the hand that others have played in getting it to this point.  I love that this room came together with the help of inherited furniture, family keepsakes and memories, and many many gifts (handmade and otherwise) from people that love us and love our little guy.  I look around and I see other people in this room and know this is just the first step in their part in his life.  What a lucky dude he is - to have so much love coming his way.

My heart is very thankful. 


Here's a source list from our nursery:

Crib: Wayfair (similar)
Rug: Home Decorators
Sheepskin Rug: Similar
Arrows: Ebay
Paint Color: Louisburg Green - Benjamin Moore
Light: Habitat ReStore, DIY'ed
Curtain: DIY'd from drop cloth bought at Lowe's
Swivel Rocker: Local - Larimer Furniture 
Ottoman: Wayfair
Large Changing Table Baskets: Target
Small Changing Table Baskets: Target
Changing Table Artwork: Free Vintage Posters.com
Frames: IKEA
Wall Light: IKEA
Book Shelf Fabric Bins: Amazon
Adventure Printable:  Oh So Lovely Blog
Quilt Inspiration: Pinterest
Felt Fire Pit: Similar on Etsy
Rocking Horse: Locally Made
Camping Signs: DIY'd
Planked Wall Tutorial
Crib Skirt Tutorial
Built In Bookshelf Tutorial
Chalkboard Tutorial


Linked to: Talented Tuesdays, May Pretty Preppy Party, Think & Make Thursday, June Before & After Party,

To see more about the nursery and how we organized it, click here

Don't miss a beat.  
{Follow this blog on Bloglovin'}
 http://www.bloglovin.com/blog/8102735/a-nurse-and-a-nerd 

-or-

{Follow this blog via Email}


Enter your email address:


Delivered by FeedBurner