Things are a wee bit different around our house these days. And when
I say a wee bit, I am referring to our wee little one. He's a game
changer.
But what a cute game changer!?
After
6 weeks of nighttime feedings, sitz baths, afternoon naps, spit-up
stained shirts, and the like, I got up enough energy and motivation to
start thinking about another project. I thought we'd start off easy...
with some crown molding in our bedroom.
But, as I
soon found out, putting up crown molding and DIYing with a 6 week old in
the house is a new kind of challenging for us.
Here & here
are the two tutorials that we used that helped us work through the
difficulties of installing crown molding. I won't be including a
tutorial in this post since I barely understand the process still.
The
thing about crown molding (and DIYing with a newborn in the house for
that matter) is that it takes a lot longer than you think. Apparently,
crown molding is a bit complicated to cut if you've never done it
before. But the more you do it the easier it gets. We started on
Saturday afternoon and were able to unsuccessfully install one piece and successfully uninstall that same piece.
Poor Michael, he was more than a little frustrated... all in 90+ degree heat and 100% humidity.
Yuck.
And I was helping on and off, whenever I could coax our little one into sleeping long enough for me to be a second set of hands.
But a day later and with a handy new little tool (seriously, if you installing crown for the first time, you need it), we were able to install the whole room.
A close up of our (Michael's) handiwork.
I feel like we have overcome a huge hurtle getting our first DIY done post baby.
It IS
possible to accomplish something when you have a little one at home.
You just have to be flexible, patient, and allow for extra time.
Right
around the time we were finishing up the crown and putting the room
back together, I found a new headboard for...get this, $15.
Now it's a
bit more than we spent on our last headboard ($5) but we felt like it
was time for an upgrade. #treatyoself
Originally
I wanted an iron headboard, similar to our old one, but hey, for $15, a girl
can change her plan. Unfortunately now our bedroom is feeling very
heavy in wood stained finishes. Dresser, desk, chest, nightstand,
headboard. I need some painted furniture in here, STAT!
I'm
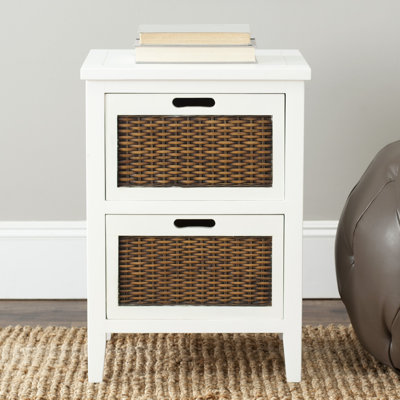
thinking two white matching nightstands. And I've been looking for some, but
apparently it is very hard to find two decent matching nightstands on
craigslist. This one I found on Wayfair caught my eye. I like the wicker mixed with the white paint finish. But it's over my cheapo budget.
And I'd love to paint Michael's desk a linen/grey color.
This dresser will stay the same, it was my grandma's and I love the color of the wood with the color of the wall.
I stumbled upon RugsUSA, who was having a HUGE 70% off sale. I decided to buy this rug when I read all the positive reviews. Hopefully it will work out!
And
then finally I have some family pictures to hang on the wall as soon as they
come in the mail. Gotta see that cute little baby face all. the. time.
So after months of being preoccupied with
decorating the nursery, it's nice to focus our attention to another room
and continue making this fixer-upper into our dream home. Slowly but
surely!
Michael and I are big into doing our research. We love consumer reports, we love reading reviews, we love hearing people's advice, we love to learn from experts. So when I get a bright idea to start a project, that just means that it's time to start researching.
A couple weeks ago I shared our bookcase project with you. Remember? It looked like this:
It took quite a bit of research on our part to accomplish this build.
My next ideas was to utilize the side of the bookcase in a different way - a magnetic chalkboard that we, and our little guy, could use.
In discussing this project with others, reading some online reviews, and looking at tutorials I found on pinterest, I learned a lot about the Magnetic Chalkboard DIY process.
And today, I'm going to share with you all the things I learned, in case you are ever interested in pursuing a similar project:
1. You can buy magnetic primer but it requires a lot of coats in order to be effective.
I was very excited when I purchased magnetic primer at Michael's. When I told my mom about my plans, she quickly shared with me her experience with it. She said that she had applied three coats (which is recommended on the can) and found the magnetic effect was very weak. I went online to read other people's experiences and the consensus was, unless you apply 6+ coats of the magnetic primer, you can expect a very weak magnetizing effect. And even then, only certain magnets will work.
2. To get a good strong magnetic surface, use sheet metal.
From tutorials I have read, it seems like the most effective way to get a magnetic surface is to purchase sheet metal. We looked at Lowe's to get some for our surfaces and it looked as though we'd have to spend about $60 for the sheet metal. We decided that we may just save that project for later. In the future though, if we are really craving a magnetic chalkboard, we'll buy the metal and then paint it up with some chalkboard paint.
3. Chalkboard Paint.
I had originally purchased the chalkboard paint at Michael's, but it was pretty pricey. I read good things about the Valspar brand of chalkboard paint which costs significantly less than what I paid at Michael's... even with a 30% off coupon. While I was planning to return my originally purchased paint to Michael's and go back to Lowes for the Valspar brand, I ended up using some of my mom's left over chalkboard paint that she had - which was Valspar. I applied 3 coats using an angled brush and foam roller. The coverage was really good and cleanup was easy.
4. "Season" your chalkboard
Another big thing I learned in researching this project was about "seasoning" your freshly painted chalkboard. For any DIY chalkboard, it is important to apply an all-over coating of chalk before drawing or writing on your chalkboard. Why? Well if you don't, it will be VERY difficult to erase the first things drawn/written on the chalkboard - a DIY chalkboard is porous and will hold onto the chalk that you apply. Note: This is true for DIY chalkboards and some store bought ones, but not all. So I would say, if in doubt, season it...it's better to be safe than sorry.
To season your board, simply run some chalk across the surface of your board horizontally and vertically to cover it entirely.
Then erase. I used a wet rag to wipe it clean.
See how it leaves some residual chalk? That's a good thing! That will prevent your words/drawings from being permanently engrained on your board.
5. DO NOT use chalk pens on a DIY'ed Chalkboard
Because many DIY'ed chalkboards are painted on either wood or drywall... stay clear of chalk pens. Yes, they are nice and neat and easy to use, but they are not meant for porous surfaces - such as wood or drywall. They will become impossible to erase. The only way to get rid of it is to repaint. Bummer.
So then how do you get a pretty detailed drawing or lettering on your chalkboard?
Here was my solution:
- Select your lettering and print from your computer
-Tape it to your surface to act as a spacing guide
-Use a chalk pencil. I purchased these at Hobby Lobby. It was easier to be more accurate using these compared to working with regular chalk, plus it was a lot less messy.
-Lift the paper and start freehanding your lettering, using the printed paper as a guide. Once I started my lettering, I moved the paper below where I was writing so that I could more easily see the example for scale and spacing.
Now to be fair, this probably wouldn't be the best strategy for more intricate lettering or drawings but for the purposes of what I was doing, it worked super well.
And just what exactly am I doing here?
Well, for our little "Great Scout-Doorsman" nursery, I wanted to put the Boy Scout Law somewhere in the room which reads (or which your husband recites from memory):
"A Scout is trustworthy, loyal, helpful, friendly, courteous, kind, obedient, cheerful, thrifty, brave, clean, and reverent."
What wonderful things to be praying and hoping for our little guy to be.
And would you look at that... it's Boy Scout approved!
Cute.
I love how the black chalkboard adds another color/texture element to the room. And it's fun!
So what do you think? Are you ready to Chalkboard it up?! I think you are!
Guys
Guys Guys Guys Guys. I'm SO excited to present to you the most
ambitious solo project we have ever attempted, let alone conquered!
So a couple weeks ago when we were working on the planked wall
for the nursery, Saint Steve and my Aunt Janet came over to check out
our project. We got to talking about this little area next to the door
to the nursery. I talked about how I felt like the space was wasted and
I wasn't sure how to use the space to get the most out of it. Not sure
who mentioned it first but eventually we got to talking about building a
bookcase there. And SS talked us through some of the materials, tools,
and process of building it.
The
big picture girl that I am... I was sold. "We can do this!"
But Michael in his
detail-oriented-ness, he needed to figure it all out before he joined
the built-in bookcase train.
Which, you know what? Is a really good thing.
It took a lot, let me repeat, A LOT of planning. A LOT of measuring. A LOT of list making.
So if you are looking for a "Step One" to building a built in bookcase, that would be it. Plan plan plan.
One problem with our space was this little air return that we had to contend with. Do you see it?
I
really wanted my bookcase to be about 12inches deep but that meant that
the left side of the bookcase would be interrupted by that air return.
After several weeks of discussion, my fantastically smart husband suggested we bump out the bottom part
of the bookcase and extend it past the air return. We just won't put anything too obstructive in front of the air return. And even if we did, there is an air return right down the hall and right around the corner in our bedroom.
So
we decided to build 18inch deep shelves at the base, and 12inch deep
shelves at the top, extending them up to the same height as the door. The bottom will provide a nice space for larger toys or bins of toys while the upper storage will be great for books, pictures, and more
precious nick nacks that need to stay away from clumsy growing hands.
Like
my rough sketch? If I were a better blogger it would be a neat
computer generated image using photoshop or some such fanciness.
Once we figured out our measurements, we had to figure out materials.
For this project we bought:
1 sheet of 0.75" pine plywood (used for our side panels and some shelves)
0.75" whitewood (used for shelf cleats)
0.75" kiln dried pine panels (for the rest of the shelves)
0.75" pine board (used for face pieces)
2 x 4 (used for building base)
We bought wide enough whiteboard and pine boards in order to cut cleats that were 1" x 0.75" and the face pieces were 1.5" x 0.75". For all the cutting, it was great to have access to a table saw - we borrowed one from SS. We used our trusty miter saw to cut everything to length!
Our first step was to tear out the baseboard in the area we were going to build out the shelves.
That
hurt a little bit. It hasn't been too long since that very trim was
just set in place and painted. Oh well, can't cry over painted trim.
Once our baseboard was out of the way, we cut our first side panel and screwed that into the studs.
Then we built our base. Some right angles and some screws, that's all it took.
We leveled it out with some shims to make sure we were building on a good, even foundation.
Once the base was built we nailed our bottom shelf down and our back cleats.
But that was after I had the bright idea to make a bit of a time stamp for this project!
Then we attached the right side panel. We used 2" brad nails to attach most of the pieces.
Then we attached our side cleats and the shelves. We mirrored this process for the top section of the shelf as well.
Attach left panel to the wall.
Attach back cleats.
Attach side panel.
Attach side cleats.
Attach shelves.
On
the top section of our shelves, we made the bottom shelf spacing 15",
the middle spacing 12", and the top spacing a bit over 12". We had read
the tutorial on Young House Love
and they had suggested the bottom spacing be a bit more generous in
order to visual look more balanced. We tried it out with some of
painters tape up on the wall and agreed. It looked better with more
space on the bottom then with equal spacing between them all. The top
spacing was a bit more generous because we wanted our shelves to line up
with our door frame and used that as a buffer. We like the way it
looks plus it will account for different size books and accessories.
Once
we had the basic bookcase built, it was time to add the pretty to
it....Meaning the trim and face pieces. We started at the top. We allowed for a 0.25" overhang past the
crown piece for our top shelf.
But before that went on we had to add what I called the
header piece which we attached from side panel to side panel. Then we moved down the bookcase adding the vertical face pieces first, followed by each horizontal face piece.
Then all we had to do was add the baseboard back on and the shoe molding.
There may have been a lot of high fiving at this point!
One
nice thing we did, that I was SUPER glad about, was cut a lot of the
boards the weekend before we did most of the building. That allowed me
to prime and paint most of the boards before it was built. This was a
huge help to me and my growing belly! That way, I only had to touch up
the spots where we filled nail holes and caulked.
Oh and guess what else got painted.... the roooooooom!!
How 'bout that planked wall?! I loved her white but I'm digging her new color!
The color is Benjamin Moore Louisburg Green.
I am absolutely in LOVE with this color. My mom came over this last
week and helped me knock out the painting (THANKS MOM!!!) and I kept
saying.. with a deep sigh... "Have I mentioned how much I'm loving this
color." :-) It's the nice army green color I was hoping for with a
smidgen of blue in it to keep it from going poop or pea in color (see
what I did there?).
Fun fact about this color, if you are a fan of the show Modern Family, it is also the exact same color as Cam and Mitchell's living room.
I
can't wait to get the book shelf filled with books, pictures, nick
nacks, toys, etc.. I plan to get some canvas bins for the bottom so we
can hide away toys in there. Here are the ones I'm thinking of.
And
because I love going back and seeing the old before pictures from when we bought our house -
before our renovation: Here's the before and after of this room when it
was still the master bedroom.
See
the door and air return are in the same place but we built out the
closet and stole some space from the room for our master closet. :-)
Memories.
And then the before bookshelf and the after bookshelf picture.
In total, we spent about $125 on building materials.
That does
not
include the cost of the small crown piece that we used at the top of the bookcase or the
baseboard pieces at the bottom because we had some of those left over
from our renovation. And of
course, we are definitely saving a bundle conquering the job
ourselves!... not to mention gaining the immense satisfaction in seeing
our project come together! I don't think it will be our last project
of this magnitude... did someone say "fireplace built-ins?!"
It was
me!!... (definitely wasn't Michael!)
This was a
big week for getting things done in the nursery! I also purchased a rug
for the room and a light. But more on that another day.
Interested in more of our nursery projects? Click here and here.




.jpg "Building A Built In Bookcase, Nursery")


.jpg "Building A Built In Bookcase, Nursery")
.jpg "Building A Built In Bookcase, Nursery")
.jpg)
